New to Me: EDC 521 DC Voltage/Current Source

Last week I came across a miscategorized eBay listing for an Electronic Development Corp (EDC, now owned by Krohn-Hite) 521 DC Voltage/Current Source. It was listed in the network equipment section, with “Juniper” as the manufacturer.

The EDC 521 is a precision DC reference source with high accuracy, precision and stability, for the calibration of meters and sensors. It can output voltage in three ranges, (0-100mv, 0-10v, and 0-100v), and constant current in two ranges, 10mA and 100mA (with compliance voltages up to 100V). In each range, the precision/resolution of adjustment is 1ppm. Overall stability in Voltage mode, within the devices operating temperature range is 7.5ppm over 8 hours, 10ppm over 24 hours, 15ppm over 90 days, and 20ppm over a year. The temperature coefficient (which is included in the above estimates). It is microprocessor controlled and has a GPIB interface to allow remote control.

To achieve its basic stability, it uses an aged and selected 1N829 temperature compensated Zener diode as its primary voltage reference. This diode is driven by a stable precision current source at a current chosen to provide the best combination of temperature stability, long-term drift and low-noise for the individual diode used in each unit. Adjustments are made using a custom, precision 24-bit digital to analog converter.

Voltage divider resistors and 1N829a temperature compensated zener voltage reference.

The DAC works by feeding the reference voltage across a resistor divider to obtain 10 output voltages, tapped at 500mV intervals. If I understand correctly, these voltages are switched to provide analog voltages for each decade, these voltages are buffered, then then weighted and summed using some precision resistors before being fed to the output amplifier.

When the package arrived yesterday, I saw why the listing had been miscategorized — it was packed in a box for a Juniper Networks switch. That, and the sticker noting a failed calibration attempt in 2009 makes me doubt the seller’s assertion that it was “pulled from a working environment.” Not that I expected a pristine, calibrated instrument for $150.

IMG_8649

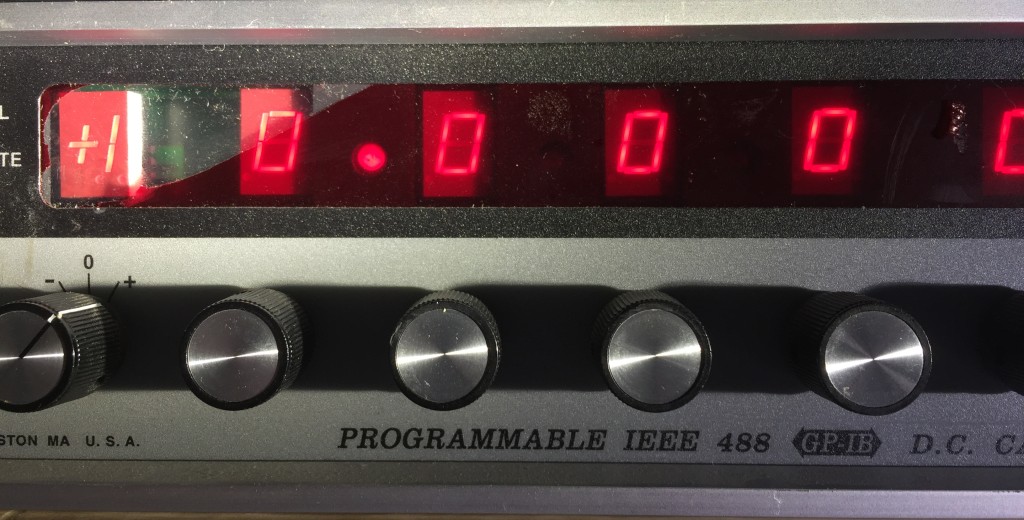
Inside the box, I found things in a bit worse physical shape than I expected. What I thought was shadow/glare in the photo from the ebay listing, was actually a torn red filter over the LED display. And the underside of the case, which wasn’t pictured in the listing, had a huge dent.

IMG_8625IMG_8643

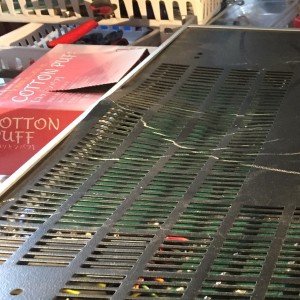
On closer inspection, the dent didn’t reach the PCB inside, and I was able to remove the panel and hammer it out. Once inside, I found that everything had a fine coating of persistent dust. Hitting it with canned air shook some of it loose, but most of it remained.

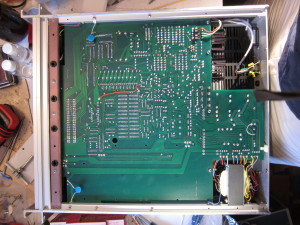
So, I got to work rinsing it with a lot of isopropyl alcohol which I then chased off the edge of the board with canned air. After a few repetitions, the top and bottom side of the board were pretty clean. I then looked over both sides of the board closely, looking for damaged components, and cleaning out little pockets of residue.

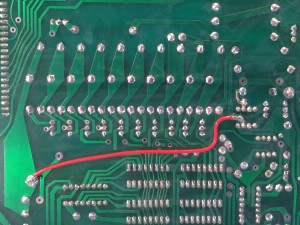
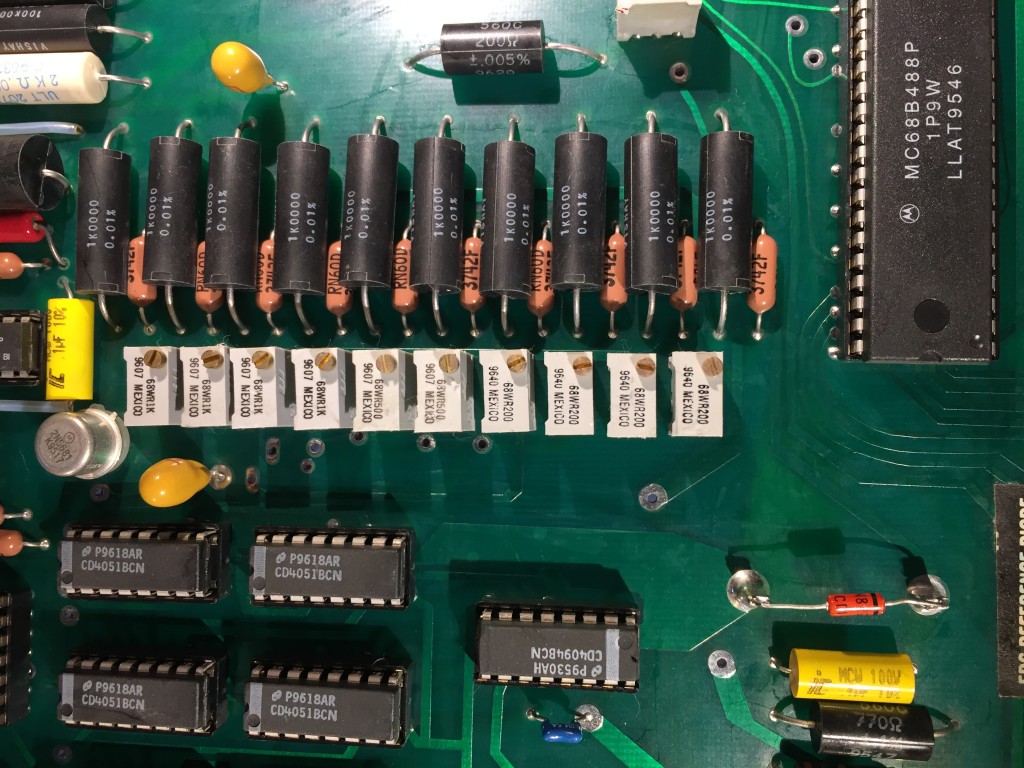
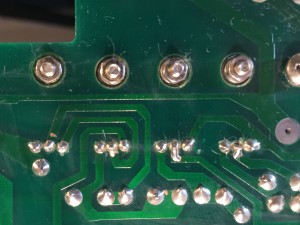
I didn’t see any damaged components, but along the way noticed signs that the board had received some major revisions. There was an obvious bodge wire on the bottom of the PCB, but it was also clear that new holes had been drilled to receive additional components. On the top side, I found a cut trace, along with a couple of added resistors and a couple of capacitors. I haven’t traced everything out, but its obvious that the bodge wire connects to one end of the internal reference divider, and the rest of it is on the opposite end, so it would seem likely that its helping isolate the reference divider, and the voltages it produces, from noise sources.

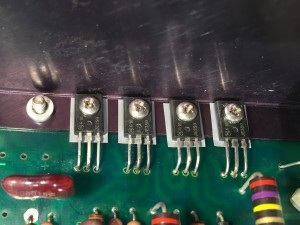
It also appears that a number of power transistors have been replaced. Unfortunately, none of the components in question have obvious date codes, so its hard to guess when the modifications were done, and whether the transistors and the filters were added at the same time. Perhaps one of you knows how to decode the markings?  First line is a Motorola logo followed by “616,” the next line is “JE350,” which is the model/part number. The datecodes on other components pretty much all date to late 1996, and the MPU board has a label with the firmware revision and is dated January 1997.

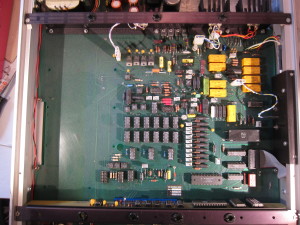
Before closing it up, I took care of the loose plastic supports for the back-edge of the PCB, which holds heavy electrolytic filter caps for the power supply. I cleaned the old, crusty, failed double-sided foam tape off and replaced it with new tape so I could stick the supports to the back of the chassis again.

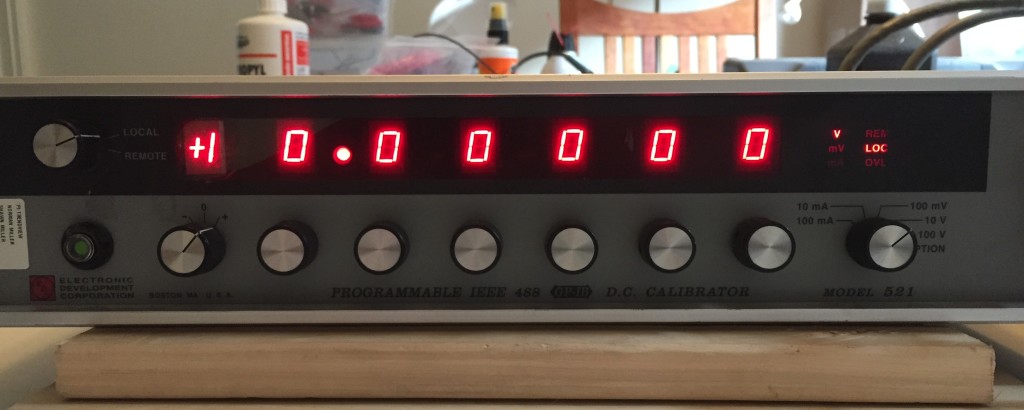
I powered it up, and gave it a quick check on all the voltage and current ranges. It seems pretty close to its 1 year tolerances. I was surprised by the amount of time it took to warm up and stabilize, but when I checked the manual, I saw that the warm up time is speced at 2 hours.

IMG_8648 IMG_8647

I powered it down over night. This morning I set up my computer to voltage readings ever few seconds and then powered it back up. I’ll post a graph once I have a days worth of data. After that, I’m going to write a script to run through all the possible settings and log the measurements. So, more to come!

KMASHI 10,000 mAh USB Power Bank / Backup Charger Teardown

I decided to buy a USB “power bank” or backup external battery to keep in my backpack to recharge my phone or iPad when I am away from the house.

I looked at lots of options over the course of a few months before I pulled the trigger. It was hard to make the decision because their seemed to be a big variance in capacity, price, and charging rates. What finally tipped me over the edge was finding a 10,000 mAh unit that could charge external devices at 2A and recharge at 2A for $17.99. Actually, the numbers associated with the model I purchased, (KMASHI 10,000 mAh) USB specs aren’t that unusual, but often times, the devices fall short of their claimed capacity. In this case though, there was a review by someone who’d done some testing and found that it pretty much hit the mark (though it did seem to fall short in the rate it charged USB devices).

When I received the product, I was a little disappointed. It worked as promised, and seemed solidly made, but It was bigger and heavier than I’d expected, and so I decided to crack it open to find out why.

It took some effort to get it open. I thought it might be glued shut, but with a little effort, I was able to persuade some of the latching tabs that held the case together to slip free by jamming something into a seam and working it around.

IMG_5700This is what I found inside. As you’d expect, a good portion of the volume is taken up by the batteries, five cylindrical 18650-sized lithium ion cells. This is the reason for the size and weight of the device. First off, the cylindrical cells don’t pack together as tightly as flat-pack pouch cells found in most phones, tablets, and higher end USB battery packs. Second, their steel walled container weighs more than the plastic membrane used on flat pouch cells.

The bigger issue though is that there are five of them, which means that they must each have a capacity of only 2,000 mAh. That’s not much. 18650 cells (which stands for 18mm diameter, 65.mm length) are widely used for laptops, battery powered tools, and even Tesla automobiles. I pulled some 18650 cells out of ~5 year old laptop battery packs that are rated for 2,600 mAh and still deliver ~2,550 mAh. More recent laptops use cells with 3,000, 3,200, or perhaps even 3,400 mAh capacity, so it would be possible to build a power bank of equivalent capacity with four, or as few as three cells, with a corresponding reduction of weight and size.

On the other hand, those larger capacity cells from Panasonic, Samsung, Sony, and others, retail for $6-8/cell, and 2,600 mAh cells go for ~$3-3.50. I am sure these cells were much much cheaper.

IMG_5701


The cell wrappers are labeled “KMASHI SO50 18650KOVL PXORXRPT 3.7V,” This doesn’t give much of a clue as to the true origin of these cells. KMASHI doesn’t appear to be an actual battery manufacturer, that comes up in other contexts. 3.7V is the typical voltage for lithium ion cells, and 18650 is a common form factor, but searches for any of the terms on the label doesn’t produce useful results. I could cut the wrap off and see if there are any clues printed on the metal, but then I’d have to rewrap the cell, which would be a pain since they are all welded together.

So, who knows what kind of cells these are, they might even be reused used cells, for all I know.

IMG_5702

This photo shows that the cells have been spot welded together in a parallel configuration, which is commonplace in multi-cell USB battery packs. I suspect the parallel approach is typically used for a few reasons. First, it should be more tolerant of lower quality cells than the series-configuration. Second, it should pose less of a risk of frying the USB device if the voltage regulation circuit is funky. Finally, it makes it easier to charge the pack off of a USB power adapter.

Looking at the end of these cells gives another hint that these may be reused cells. From my experience, raised bottoms are unusual on 18650 batteries, and others have reported that they are often used to hide the evidence of old welds on cells that have been pulled out of assembled battery packs.

If they are reused cells, that causes me some concern. If they are good quality cells from battery packs that just sat on the shelf (aka New Old Stock), then it would be a non-issue as I have obtained cells that way myself. If they’ve actually been used, or if they are from very old packs though, thats a problem, as they could fail prematurely, and failing lithium ion batteries can be dangerous.

IMG_5699


For completeness, I give you the printed circuit board, which is labeled as “WNT-816 Rev 1.0” and “PN:20140422” on the top. I can’t say much about the components. The two largest chips appear to have been sanded to obscure their origins. There are two other chips that have their markings which read “FS8205A,” near as I can tell, they are used for managing the discharge of lithium-ion batteries.That, and the inductor is solid-core, unlike the many hollow-core inductors I’ve seen on the powerbank PCBs they sell on Fasttech.

IMG_5705

On the bottom, it is labeled “wesemi-816.”

I reassembled it and I’ve used it since taking it apart. It works pretty much as expected. I’ll post an update in a few weeks once I get some stuff I ordered for testing USB power sources.

Lenmar and NuPower MacBook Pro Battery Pack Teardown

Today I took apart two different 3rd party battery packs for the 2006-2008  15″ MacBook Pro. The OEM batteries had the following model numbers A1175, MA348, MA348G/A, MA348J/A, MA348*/A.

These packs probably date from early 2010.

NuPower and Lenmar batteries

NuPower and Lenmar batteries

The first is a Newer Technology NuPower 63Watt Hour Capacity Battery, part # NWTBAP15MBP58RS. There is a barcoded sticker on the outside with the number U091228A11753.

The second is a Lenmar, 10.8v, 60WH/5600 mAh. Model/Part LBMC348.

Superficially they look very similar, but their are some significant differences in their construction.

The NuPower has a relatively thick aluminum plate on the outer surface that is glued to the case. If I recall correctly, this glue failed prematurely and had to be redone. The bottom section of the battery pack is a single piece of plastic, though the back side is painted with a metallic paint to simulate the appearance of the original Apple battery. While this would seem to be a reasonable construction approach, one has to wonder why Apple chose to use a metal back in the first place. A metal back would be thinner than a plastic back, and also transfer heat more readily.

The Lenmar uses a thinner sheet of aluminum for its outer plate. This plate is then adhered to a thin steel sheet that has various bent tabs which catch and latch into the plastic frame of the bottom case. The plastic frame is then glued to a thin steel tray. This is closer to the construction of the original Apple battery pack

Internal view of NuPower and Lenmar battery packs

Internal view of NuPower and Lenmar battery packs

Once inside, we see a more significant difference in the construction of the two battery packs.

5,600 mAh Lithum polymer pouch cells in NuPower battery pack

5,600 mAh Lithum polymer pouch cells in NuPower battery pack

Cells from Lenmar battery pack

Cells from Lenmar battery pack

The NuPower pack, on the left, has a single stack of three 3.7v 5,200 mAh cells. They are labeled as Yoku 3895130, 5,200 mAh/3.7v, BL9120407012749. They measure ~130x95mm and the stack of three is ~11.25mm thick.

The Lenmar pack, on the right, has 3 stacks of pouch cells, each stack is 2 cells deep, connected in parallel. They are labled as YLE 3.7v, ICS594395A280 468061801483. Each pair of cells is ~90x42mm and is also ~11.25mm thick.

I don’t have an original Apple battery around to use in a close comparison, but the Lenmar battery pack construction is much closer to my memory of the stock Apple battery, both in terms of cell configuration, and assembly. I’m still not sure what to make of the absence of a metal back on the NuPower battery. I thought perhaps the Apple and LenMar batteries used the metal back to accommodate a slightly thicker battery, but that doesn’t seem to be the case, since the thickness of the cells in both the Lenmar and NuPower packs is 11.25mm. I don’t know how thick the cells are in an original Apple battery, but I suspect that the metal is there for better heat transfer, and its omission seems like an undesirable bit of cost cutting.

Looking more closely at the cells, I see that Yoku is a battery manufacturer based in Fujian, China. I’m going to guess that the “3895130” gives the dimensions of the cell, 3.8x x95x130mm, which pretty much matches with the dimensions I measured. I don’t know what the remaining number is, but my guess is that it is a manufacturing lot code.

YLE is manufacturer based in Shenzen, China. and ICS594395A280 is a documented part number for a 5.9x43x95mm 2,800 mAh/3.7v cell.

Interesting that the nominal capacity of the Lenmar cells are higher than the cells used in the NuPower, but NuPower claims theirs is a 63 Watt-hour battery, while Lenmar only claims 60 Wh. At this distance though, what I know is that the Lenmar pack is well and truly dead. Two of the parallel packs had voltages ~1v, which is dangerously low. The remaining pair of cells was ~2.6v, which might still be safe to use, though I’d have to put it through testing to see how much of the rated capacity remains. The NuPower still works, and the cells were at something close to 3.7v each. The estimated capacity of the pack, as reported by System Information, is quite low though, perhaps 50% of original, which is why I decided to tear it open in the first place.

I’m not sure what I’m going to do next, other than recycling the low cells. I’ll probably set the good cells aside until I get a hobby charger that I can use to analyze them and decide whether they are worth keeping to power misc projects.

I’m also going to look into buying replacement cells and rebuilding the packs, provided that the price is right and the seller is reputable. I could just order a replacement for the whole pack, but I’d be a bit concerned about getting old stock at this late date.