Increasing RAM available to GPU on Apple Silicon Macs for running large language models

Apple Silicon Macs have proven to be a great value for running large language models (LLM) like Llama2, Mixtral, and others locally using software like Ollama due to their unified memory architecture which provides both GPU and CPU access to main memory over a relatively high bandwidth connection (compared to most CPUs and integrated GPUs).

High end consumer GPUs from NVIDIA cost $2000+ and top out at 24GB RAM. Using multiple cards requires more expensive motherboards and careful case, cooling and power supply selection. Apple Silicon Macs are available with up to 192GB RAM. MacBook Pros are available with 128GB and refurbished systems are available at a deep discount.

By default, MacOS allows 2/3rds of this RAM to be used by the GPU on machines with up to 36GB / RAM and up to 3/4s to be used on machines with >36GB RAM. This ensures plenty of RAM for the OS and other applications, but sometimes you want more RAM for running the LLM. Fortunately the VRAM split can be altered at runtime using a kernel tunable.

You change these settings using a utility known as sysctl, which has to be run with sudo. The key you use depends on whether you are running Ventura or Sonoma

  • On Ventura: debug.iogpu.wired_limit
  • On Sonoma: iogpu.wired_limit_mb

By default they have a value of 0, which corresponds to the default split described above. If you want to increase the allocation you set them to the value you want in megabytes.

For example

  • Sonoma, sudo sysctl iogpu.wired_limit_mb=26624 will set it to 26GB. 
  • Ventura the equivalent is sysctl debug.iogpu.wired_limit=26624

I’d leave ~4-6GB free for the OS and other apps, but some people have reported success with as little as 2GB free for other uses. Before going that low I’d quit non-essential applications and make sure files are saved just in case there is a problem and the system panics.

Note: Ollama now runs models on CPU if it thinks they are too big for the GPU RAM allowance. Originally, it based this on total system memory, rather than the actual allowance. However, as of 0.1.28, Ollama honors this setting change and so you can run larger models on GPU

What is iOS doing while my iPhone is sleeping?

The short answer to what iOS is doing while my iPhone is sleeping is that I did some digging, and I still don’t know, but something doesn’t seem quite right.

I upgraded my 3 year old iPhone XR to iOS 15 a few days after release. Overall I’ve been happy with it, but I noticed something odd a few days after upgrading. When I clicked the People album in photos, which is populated by face detection and analysis algorithms, it said that it had only processed about half of the 42K photos in my photo library and that I should lock my phone and connect it to power to complete the process.

I didn’t think to much of it at first. I usually charge my phone at my desk in the morning, rather than overnight by my bedside, so I can use a solar-charged battery bank. This means it only spends a couple hours a day locked and connected to a charger instead of the average 8 hours most phones get when charged overnight. So, I left my phone locked plugged into power for most of the day. I was surprised to see that the face scanning made little-to-no progress in that time.

I tried leaving it charging overnight without much improvement. I tried force quitting photos before powering and locking the phone. That yielded some progress the first time I did it, but not the second or third time. I tried lots of different obscure things which didn’t make much difference either. I tried putting it in airplane mode before leaving it powered and locked on the theory that perhaps iCloud was locking a critical resource and not releasing it. No one thing made an obvious impact, and certainly not twice. Never the less, in the space of a few days, it managed to process almost 40K of my photos in fits and starts. There were, however, 2,032 left and the phone made no progress against that.

At this point I started wondering if I could gain insight into what the phone was doing while locked and powered. I thought I remembered that the Console app on MacOS could stream logs from iOS devices, in addition to those of the host Mac system. I started out by filtering the copious log messages by “face,” and then excluding terms like “interface.”

In time I learned that there was something called com.mediaanalysisd.photos.face that sounded processing, only it wasn’t getting the chance to run because it wasn’t compatible with something else that was running. By watching the logs a bit I learned of other agents that contended with eachother for the chance to run on my sleeping phone. Many of them also seemed involved in analyzing photos, for example:

  • com.apple.mediaanalysisd.photos.ocr
  • com.apple.photoanalysisd.backgroundanalysis
  • com.apple.mediaanalysisd.photosanalysis
  • com.apple.mediaanalysisd.fullanalysis
  • com.apple.mediaanalysisd.photos.visualsearch
  • com.apple.mediaanalysisd.embedding.photos

I’ve seen most of them get chances to run. Once they run, they run for tens of minutes. However, they all take a back seat to com.apple.corespotlight.knowledge and the associated spotlightknowledged process, which runs for at least 15 minutes at a time, and seems to get the chance to run every other time. I’d guess than in the last 18 hours or so it’s been running for at least 10 hours. I have no idea what it’s doing, either.

Most of the other agents write a fair amount of information to the console. It can be pretty esoteric, but one gets a sense of progress. Spotlightknowledged says very little and most of what it says comes at the beginning of a run. From then on, the main indication of progress is dasd giving updates on how long it’s been running and all the other jobs that aren’t running because of it. Then, at the end, often near the 15 minute mark, spotlightknowledged announces “SpotlightKnowledge – too long till check in” and then that it’s exiting. Often as not, dasd then gets spotlightknowledged running again, though sometimes it gives others a chance.

Google doesn’t turn up any information about com.apple.corespotlight.knowledge or spotlightknowledged, none at all! There is Siri Knowledge which provides access, in various contexts, to information from Wikipedia, Wolfram Alpha and perhaps other curated sources. There is also something called knowledgeC.db tucked away in /private/var/mobile/Library/CoreDuet/Knowledge/ which stores information on all sorts of your activities on your iOS device. Spotlightknowledged could be involved in either of those, both of them, or neither of them. Whatever it’s doing, it seems to be busy.

Or maybe spotlightknowledged is buggy? “SpotlightKnowledge – too long till check in,” along with the relative lack of other log messages makes me wonder if it never finishes what it’s setting out to do and starts all over again. In doing so it deprives other agents, like the one doing face analysis, of time to do their own work.
Apple Music Lossless and AirPlay don’t Work Like You Think They Should

UPDATE June 23, 2021: My testing, below, was done on MacOS. There is evidence that the iOS version of Apple Music behaves differently with AirPlay v1 receivers. I will investigate further as time and ability permits.

June 25, 2021: More information that adds to the picture on iOS. It looks like AppleMusic on iOS and MacOS use AAC when the apps is set to use an AirPlay 2 receiver for output. However, when the output is an AirPlay v1 receiver, the iOS version apparently maintains a lossless chain from Apple’s servers through to the AirPlay receiver (MacOS switches to stream an AAC version from Apple’s servers and then uses ALAC to transport that over the LAN)

Earlier this month Apple released an update to Apple Music that allows “lossless” streaming in addition to the previous high-quality AAC compressed version. People assumed that they’d be able to play back these lossless streams losslessly over AirPlay because AirPlay uses lossless ALAC (Apple Lossless Audio Codec) to transport audio. Unfortunately, this isn’t true.

What is true:

Apple Music on MacOS does not transfer lossless data over to AirPlay 2 receivers when playing Apple Music lossless tracks. The situation on iOS is unclear at this point.

  • Apple doesn’t say anything about AirPlay on their Apple Music Lossless support page (as of 2021-06-17). They do say that HomePods, which are AirPlay 2 receivers, only support AAC playback at this time.
  • An AirPlay 2 licensee reports that Apple Music sends an AAC stream to their devices when playing back Apple Music Lossless tracks, despite device support for ALAC. Their example suggests they were using an iPad to send the stream to their AirPlay 2 receiver.
  • When playing an Apple Music Lossless track on MacOS to an AirPort Express v2 the lossless icon is displayed. The data rate between my computer and the Airport Express v2, which supports AirPlay 2, averages out to be about 256kbps (delivered in bursts), rather than the steady 800-1000kbps I see when playing an ALAC rip I made of a CD.
  • Apple does use ALAC when playing to an original AirPort Express over the original AirPlay (which is all the hardware supports). This is evidenced by the steady 800-1000kbps data stream between my computer and the AirPort Express. However, in this case, Apple Music reports that the track being played is in AAC format.
  • The Wikipedia page on AirPlay is out of date.

There is no reason to think it works any differently on iOS devices, particularly since the AAC support was probably added, in part, to reduce power consumption on battery powered devices. AirPlay 2 added support for a variety of codecs, bit-depths and sample rates, in addition to the ALAC used by the original AirPlay/AirTunes protocol.

For some reason they seem to be bending over backwards to avoid an unbroken lossless chain between Apple Music’s servers and AirPlay (v1 and v2) receivers. We’ll see if this changes.

Background

AirPlay, or AirTunes, as it was then called, originally only supported lossless transmission using the ALAC codec when it debuted in 2004 alongside the original AirPort Express. This remained true when Apple released the upgraded AirPort Express v2. Along the way Apple also added AirPlay support to the Apple TV along with licensing the technology to 3rd parties to incorporate into devices like AV receivers. People also cracked the encryption used by AirPlay and reverse-engineered the protocol leading to software like shairport-sync which has been incorporated into various commercial and open source products.

Then, in 2018 Apple released AirPlay 2 alongside the new HomePod smart speaker. They upgraded Apple TV to support AirPlay 2, and, to people’s pleasant surprise, also released an firmware update for the long discontinued AirPort Express 2 that added AirPlay 2 support. The new protocol was also licensed to 3rd parties for incorporation in their products.

AirPlay 2 enabled multi-room playback over AirPlay from iOS devices; they’d previously only been able to play to a single AirPlay endpoint at a time. Related to that, AirPlay 2 allowed multiple HomePod speakers to be used as stereo or surround-sound speakers. People assumed that this new functionality continued to use the lossless ALAC codec for transferring audio data between the Mac or iOS device and an AirPlay 2 receiver. The truth was more complicated.

In order to support the new use cases mentioned above, AirPlay 2 included some significant changes. First, it added a buffered mode that allowed a significant amount of data to be stored in RAM on the AirPlay 2 receiver device, rather than streaming it in realtime. More significantly, they added support for other codecs, sample depths and sample rates besides the 16-bit, 44.1kHz ALAC used by AirPlay 2. One of those new combinations was the high-quality but lossy 256kbps AAC that Apple used for iTunes downloads. Many of these details are documented by people working to reverse-engineer AirPlay 2. Combined, these changes reduced power consumption for mobile devices and allowed more headroom to avoid glitches when playing to multiple AirPlay 2 receivers at once.

When Apple announced that Apple Music would support CD-quality lossless audio, people (including me) assumed that it would work with AirPlay devices because they too supported CD-quality lossless audio. However, as I detailed above, this has proven not to be the case.

It seems like Apple has gone to some effort in order to avoid an unbroken chain of lossless audio from Apple’s servers to AirPlay 2 receivers. I speculate they may doing this to keep people from downloading and distributing high-quality lossless content by way of the already cracked AirPlay v1 protocol, or an eventual compromise of AirPlay v2. Given this, I wonder if we’ll ever get the fully lossless signal chain we want over AirPlay, at least not without a new version of the protocol, a change that may require a “forklift” upgrade of AirPlay receivers to take advantage of.

Or maybe it’s all a bug. Apple Music’s Lossless and Atmos roll-out certainly has come with plenty of other glitches and blunders.

Footnotes

  • I’ve only focused on the evolution of AirPlay audio support; It also has support for photos, video and display extension/mirroring.
  • On a Mac, if you choose “Computer” as the output in Apple Music and then choose an AirPlay (v1 or v2) device as your output from the MacOS “sound” menu it will use a lossless signal chain, but it will run the output through the system mixer (so system sounds like alerts will come out the AirPlay receiver).

Apple Store Feedback

I recently visited an Apple Store to get my MacBook Pro’s “butterfly” keyboard replaced. After the visit I received a survey asking about the experience. I ended up writing a long (considering the context) critique, and thought I’d also post it here.

It’s too noisy and chaotic. The chaotic feeling is partially due to the noise, but also because the design of the store doesn’t offer affordances for customers with differing levels of experience and differing priorities.

When I go to an Apple store, I generally have a sense of urgency, otherwise, I’d be handling things through the Internet and mail.

I’ve been to the Apple store for service 2-3 times in the past 12-24 months, and yet, I’m still not confident in my understanding of what needs to happen when I’m in the store. Where do I need to go? Who do I need to talk to? Is that a black shirt, or a dark navy blue shirt?

I go to an Apple store because I have some sort of problem I need to solve, either with a purchase, or by getting service or tech support. When I walk through the door, I should start feeling calmer. Instead, I feel more agitated. When I leave, I should feel, if not satisfied, then at least relieved. Instead I have lingering agitation.

There are too many people doing too many things in an undifferentiated space. I imagine that having classes sharing that space is supposed to invite people in to the session. Maybe it does, but it also adds amplified noise to the entire space. The fractured repetition of a Garage Band class is literally crazy-making for those in the service/support area. It makes conversations difficult, and makes waits seem longer.

I am happy, though, with the latitude that the support staffer had to make things right with the manufacturing defects in my out-of warranty computer. I’d prefer the keyboard just worked and the screen didn’t have growing blemishes, but one of the reasons I stick with Apple is that I know you’ll make things right.

Mac OS X Kernel Panics with RTL-SDR/RTL2832U and Analog Discovery, and a Fix

Earlier this week I fired up WaveForms in order to do some spectrum analysis of power supply rails hooked up to a Class D amplifier board using my Analog Discovery. Before I got the Analog Discovery plugged in though, my computer froze, the screen went dark, and then a kernel panic error displayed.

This was new, I’ve never had a problem before, whether or not the device was hooked up before firing up the software. I tried again, this time making sure the Analog Discovery was plugged in before launching Waveforms. Another kernel panic. I tried again, this time plugging it directly into my laptop, rather than the USB3 hub I use for convenience. Another kernel panic. I muttered and cursed and speculated that the cause was the OS X 10.11.6 update I’d recently installed, and ended up using a Windows machine for the task instead.

A few days later, I received a cheap RTL2832 USB DVB receiver I’d purchased in order to (finally) experiment with Software Defined Radio (SDR) using RTL-SDR software. My first explorations were tacked from base camps on my patio and bed. Everything worked without issue. The third time though, I was at my desk, and as soon as I launched CubicSDR my computer froze, went black, and then complained of a kernel panic.

I was peeved. I thought, perhaps that my hub was an issue, so I plugged the RTL2832 in directly. It worked. I tried a different hub. It worked again. I tried something else, it crashed.

Eventually, I figured out that the problem only occurs with a USB3 to Gigabit Ethernet adapter connected (with or without a hub involved). The adapter in question is based on the RTL8153 chip, which is used in USB3 to GigE adapters sold under many different names.

This chip is complaint with standard USB Ethernet protocols, and works with generic drivers provided by Apple in OS X 10.11 (El Capitan), and perhaps earlier versions. I’d installed the Realtek provided driver in order to take advantage of some features of the chip which might improve performance and power consumption, but not to a significant degree.

By removing the Realtek RTL8153 driver using a script provided in the installer package, I was able to revert to using the generic apple USB Ethernet driver. Now, I can use my Analog Discovery with Waveforms, my RTL-SDR with CubicSDR, and my USB3 Ethernet adapter at the same time without Kernel panics.

The cheapest/best 2012 Retina Macbook Pro SSD Upgrade

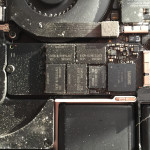
Long-time Retina MacBook Pro owners finally have some reasonable storage upgrade options. Apple has used proprietary SSD form-factors and connectors for their thin notebooks since the second generation MacBook Air was released, but they’ve always used standard storage protocols, like SATA.

I’ve long hoped that someone would come out with a simple, inexpensive adapter that would allow a commodity mSATA or m.2 SSD in my Retina MacBook Pro, but I could never find any on the market. When I needed more storage, I decided to supplement my original SSD by fill my laptops SDXC slot with a 64GB micro SDXC in a shortened microSD-SD adapter. It wasn’t exactly cheap, or fact but it was affordable, worked well enough. OWC offered an upgrade for the original SSD, but it was relatively expensive, particularly since I replaced, rather than augmented the original storage, and it was slower than the stock option.

I knew I’d outgrow the add-on card someday. I was heartened that some companies offered larger, higher-performing shortened SD cards, and that Trancend released a line of Apple upgrade SSDs to compete with OWC, but I still thought an adapter would be the best approach. I gave more than idle thought to developing and selling my own adapter, since no one else was doing it.

In the meantime, I managed to keep ~40GB free on the original SSD. Then, this past week, all that space filled up almost overnight. I’t seems that a 15 video I was editing in iMovie resulted in the creation of lots of temp files. I tried to make more space, by copying stuff to a server, and I succeeded well enough to have enough room to finish editing the video. I knew though, that it was time to find an upgrade.

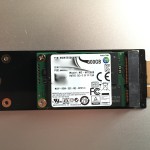
The OWC options still weren’t very compelling, and my next step was to see what the market for original equipment SSDs was on eBay. The prices weren’t too bad, if I could put aside concerns about the quality and provenance of the drives. I decided to search for adapters, and didn’t find anything at first, but stumbled across a company called MaxUpgrades, that was selling Samsung EVO 840 SSDs with an rMBP adapter for non-obscene prices (Warning: BAD website).

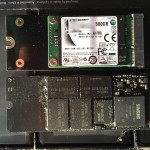
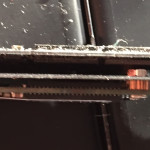
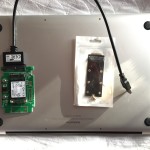
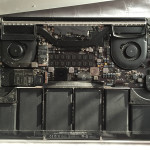
With more digging, I found similar, if not the same, adapter cards were on Amazon for ~$20 and on eBay for ~$10. So, I ordered the adapter, a 500GB Samung 840 EVO SSD, and another adapter that would let me use the mSATA SSD with a USB3/SATA adapter cable I already had to migrate my data before installing it in my Macbook. It only took a few days for all the parts to arrive, and an hour or two to get the data copied and install the new SSD + adapter in my computer.

Everything was pretty straightforward. I think the one thing that I wasn’t sure about was how to transfer everything to the new SSD. I originally settled on using demo version of Carbon Copy Cloner, but then I realized that I could do what I needed by rebooting in recovery mode, running Disk Utility, and then restoring to the new SSD using the old SSD as the source. In addition to moving the OS install and all my data, DiskUtility automatically creates a new recovery partition.

Once that was done, I rebooted from the new SSD over USB to check to make sure it worked before shutting down and installing the new SSD, with the OS, data and everything already transferred. Once I had everything back together, it booted right up.

I’ve ordered an adapter that will let me use the old Apple SSD in place of a 2.5″ SATA drive. I’ll probably put it in a case with an integrated USB3 adapter and use it for extra speedy storage and backup.

A few things to consider before doing this yourself:

  • The mid-2012 and early-2013 retina MacBook Pros (MacBook Pro 10,1, A1398) use the SATA 6Gbps protocol to connect to SSDs. Later models use PCIe, but I don’t know if the necessary adapters exist.
  • This upgrade might create issues if you are still under the original or extended AppleCare warranty. In theory, “user replaceable” parts don’t invalidate the overall warranty in the US, but Apple might argue that their SSDs are no longer user-replaceable.
  • Opening up an rMBP and removing the SSD requires a special pentalobe screwdriver. I used this inexpensive toolkit, which has the necessary bit, and many others.
  • Cheap Chinese electronics from ebay can be a great deal, but the quality and documentation is inconsistent. Compatibility (and incompatibility) information should be taken with a grain of salt.

Animated Crashplan Icon Causes Window Server to Burn CPU on OSX

I use Crashplan for backup on OSX. Tonight I happened to notice that the OSX windowserver process was consistently burning ~25% of a CPU core on my Mac for no reason. I also noticed that Crashplan was backing up my computer at the time.

I decided to try switching the preferences for the Crashplan menu bar icon to disable animation, windowserver’s CPU utilization dropped. I turned animation back on it jumped back up.

Someone should change the default.

Quick impressions: iOS 8 on the iPhone 4s and iPad Retina (3rd generation)

I installed iOS on both my iPad Retina (3rd gen) and my iPhone 4s. I had some misgivings, since they are both at or near the bottom of the barrel in terms of supported hardware for this release. After some research though, it sounded like the iPad would do reasonably well. As for the iPhone, well, I should have a newer model in a week or two if it doesn’t work out.

My report is that both of them seem to work just fine. There may be a few more rough spots and hitches than before, but if there are, they are rare and subtle (for the most part), and they are counterbalanced by new features and refinements.

One issue on the iPhone 4s is that all the other models supported by iOS have taller displays, and so some UI is more suited to larger phones. The only place where this really stands out is when composing an email. Between the predictive text selections above the keyboard (which can be hidden, if desired) and the new UI affordance for easily switching between the email you are drafting and other messages, there isn’t much room to read the text you are writing.

There are definitely signs of memory pressure though. Tabs in Safari need to reload more (too) often and switching between some apps can take a little too long.

My advice for iPhone 4s users is to wait until they release a round of bug fixes, unless you absolutely need to try the latest and greatest.

As for the iPad, I don’t notice many differences in interaction experience from iOS 7. Safari may need to reload tabs a bit more often, but no where near as often as on the iPhone.

My advice for anyone with a 3rd generation iPad, or better is: If you want it, go for it.

If you want to know why you’d want to upgrade in the first place, there are lots of reviews of what’s new in iOS to choose from. Its worth noting though, that some features aren’t available on all devices. It looks like my devices will be left out of some of the seamless handoff as you move from a Mac to your iPad, or vice versa. One thing that just worked though, incoming phone calls show up on my iPad, and I can choose to answer them there, if I want. Not a huge deal, but convenient in some situations.