DIY Downsides: When successful troubleshooting deprives you of an excuse for upgrading.

The same base urges that led me to upgrade my home server, have had me itching to upgrade my home network. The server build sated that hunger for a while, but now that it is done, I’ve been feeling the pull, again. I’ve held out, but yesterday, I thought I was going to HAVE to upgrade because one of my routers started acting up. Happily/sadly, successful troubleshooting has stimied such rationalizations.

The current network arrangement consists of a Netgear WNDR3800 running OpenWRT as the main router/firewall. It has direct connections a couple of small ARM servers running Debian, which run various services. It also provides WiFi access. At the other side of the house, there is another router, a Netgear WNDR3700, also running OpenWRT that is bridged to the main router over 5GHz WiFi. It provides wired connectivity for a printer, a server, and a Acu-Link bridge that connects a weather station to the Internet. It also provides WiFi access in the 2.4GHz band and guarantees decent connectivity from our back yard.

I’ve been considering various options for upgrading, with the goals of getting a higher-speed link between the two routers, and a speed bump for my laptop, which has a 3-stream radio, whereas the routers are limited to two streams. I wasn’t entirely happy with any of the options though, which is one of the reasons I’d been able to resist the upgrade urge.

Yesterday though, as I’ve already mentioned, things started getting flakey. I noticed that the second router seemed to be rebooting every ten to fifteen minutes, interrupting connectivity for connected devices for a good 60-90 seconds. I could have used this as an excuse to upgrade, but I tried to troubleshoot the problem first.

I’d recently moved some equipment around, so the first thing I checked was that the power cord hadn’t been partially unplugged. It didn’t seem like it had, but I made sure it was well plugged in and waited to see if the problem continued. It did.

As part of the equipment moves, I’d swapped in a higher-capacity UPS. The UPS had been functioning just fine, in its previous location, but I wondered if it was adding noise that the routers power supply was having trouble contending with, so I swapped in another 12V DC wall wart. At first, that seemed to solve the problem, no reboots in over 20 minutes, but before another 20 minutes were over, the router rebooted again.

I wondered if it was a temperature issue. It was a warm day, though no warmer than other days this summer. I decided to take the router apart to see if there was any dust slowing down convection from the case. Once I got the case open though, I realized that I’d already opened and cleaned out the router a few weeks before. Back to the drawing board.

I decided to open up an SSH session so I could watch the system log (OpenWRT logs to a ring buffer in memory, so you have to use “logread -f.” in the hopes that I’d see something useful before the device rebooted itself. Once I had that running, I took my dog for a ~60 minute walk. When I returned, the router was still running, still logging to my screen. I scrolled back over the logs, and didn’t see anything unusual. I started to wonder if it was a “heisenbug.” Perhaps I was going to have to upgrade after all.

The log filled with information about connections and disconnections from WiFi devices, and IPv6 related housekeeping. A few minutes later though, something different flashed past on the console. I scrolled back and saw that the kernel reported that it detected a low memory condition and killed off a maintenance script to keep from running out of memory. I thought it strange, but I didn’t see what would have changed to make low-memory conditions commonplace, or how they’d lead to a reboot. It was, however, my only lead, and as I sat there thinking it over, I saw another low memory warning.

It was starting to make sense, I imagined how the router could get in a situation where it killed off an essential process and ended up rebooting. It might even be that the router hardware had a watchdog function, which would reboot the device if a process didn’t reset the watchdog timer on a regular interval. Killing that process could lead to a reboot.

Now that my only lead was starting to seem plausible, I dug deeper. I first checked the amount of memory in use with the “free” command. It reported there were less than 2MB free, which surprised me since I remembered it was typically many times that. Next I used “ps” to see what processes were running, and which were using the most memory. None of them were obviously huge, but a few of the larger processes didn’t look quite right.

I have an Acu-Rite weatherstation and an Acu-Link bridge. The bridge relays readings from the weatherstation to Acu-Rite’s servers. I have a system in place to capture the data as it is being transmitted, and feed it to Weewx on one of my servers. Weewx keeps its own record, and also updates Weather Underground. To accomplish this, I have a startup script on the secondary router that uses “ncat” to wait from an incoming connection from the driver I wrote for WeeWX. Once the connection comes in, ngrep sniffs for packets from the Acu-Link bridge relaying data from my weather station to the internet service. That data forwarded overmy network to the waiting weewx driver on my server.

The problem was that there were 3-4 copies of these processes running on the router. Ordinarily, there should only be one. After a connection is lost temporarily and weewx has reconnected, there might be two running before the old copy times out. I tried reducing the max number of connections from four to two, which helped a bit, but it was still cycling the connection much to quickly and for no obvious reason.

I tried restarting weewx, but that didn’t help, it was still connecting and then disconnecting too frequently. To debug things further, I decided to simulate the server connection and see if the data was being captured and forwarded properly. It wasn’t!

From here, I wanted to connect to the diagnostic webserver running on the Acu-Link to confirm that it had a connection to the weather station. I looked at the main router to find the Acu-Link’s IP address, and in the process I realized that it had changed. I hadn’t created a DHCP reservation for the Acu-Link device because DNSMasq, which provides DHCP service on the router, generally provides a stable IP address to devices. Something had happened though, probably when I was moving around hardware, and it had assigned a new IP address.

So, to recap:

  1. My script was depending on a result of the default behavior of DNSMasq for the IP address of the Acu-Link bridge.
  2. As a result of reconfiguring my network, something changed, and with it the result of that default behavior, leading to the IP address of the Acu-Link bridge changing.
  3. As a result, of the changed IP address, my script for sniffing weather data failed to collect that data and forward it to weewx running on my server.
  4. Because it wasn’t getting data as expected, weewx tried to reconnect to the sniffer script.
  5. Because weewx was reconnecting as frequently as it was, excess copies of ncat, ngrep and the ash shell accumulated on the router, eating up memory.
  6. Because of the low memory condition, the kernels out of memory killer (OOM killer) started killing off processes.
  7. Because some key process was killed by the OOM killer, the router rebooted, continuing the cycle.
  8. Because the router was rebooting frequently, I decided to troubleshoot it.
  9. Because I succeeded in troubleshooting the root cause, I have removed a reason to buy a new router.

Sometimes being awesome has to be its own reward, I guess.

Since I couldn’t in good conscience buy a new router, I did a few easy things to fix the problem. I configured the DHCP server to assign a predefined IP to the Acu-Link bridge, and update the script to look for packets from that IP.

There additional mediations to this issue that I probably won’t undertake, including:

  1. Updating my WeeWX driver to make sure it properly cleans up sockets when reconnecting. This might lead to quicker cleanup of the old processes on the router.
  2. Updating my WeeWX driver to throttle the rate at which it retries connections.
  3. Trying to automatically detect the IP of the Acu-Link bridge and then use that IP for the ongoing packet sniffing.
  4. Adding some code to the sniffer script that will be more aggressive about cleaning up unused connections.
 

ASRock AM1B-ITX + AMD Kabini Sempron 3850 Linux Notes

Earlier this summer I built a new home server using an ASRock AM1B-ITX motherboard and a AMD Kabini Sempron 3850 CPU.

To make a long story short, this motherboard doesn’t work well for my intended use as a headless Linux server. The problems are manifold and interconnected:

  • If I boot headless, it decides the integrated GPU isn’t being used.
  • Once it decides the integrated GPU isn’t being used, it tries to use a PCI Express GPU, which it doesn’t find.
  • At some point, it also reactivates compatibility mode.
  • With compatibility mode activated it is, ironically, incompatible with my combination of hardware.
  • The combination of all of the above means that it won’t boot headless.


These issues weren’t immediately obvious. The storage issues showed up early on, once I added the extra drives, but others took longer to show their face because, while I’ve been using it for its intended purpose for a couple of weeks now, I only just finally got around to moving it off the corner of my desk and into its final position on a shelf in a closet. I assumed this move would be relatively uneventful. It wasn’t, it was frustrating and tedious.

By way of context, I thought I’d give a few more details on my installation.

The system drive is a 256gb Crucial MX100 SSD. The root volume is relatively small, like 8GB or so. There is a small swap partition, an EFI partition, a good chunk of unused space  as a lazy sort of SSD over-provisioning for longer life, but the bulk of the drive is set aside as for SSD caching of various volumes using Bcache. The root volume is un-exotic though, straight ext4. I’d intially set the system up to boot using legacy BIOS, but after some backflips, managed to convert it to use gpt partitions, and UEFI booting.

The SSD is connected to the main SATA3 controller on the Kabini SoC, as is a 3TB Western Digital Red drive. There are two other motherboard SATA3 ports provided by an ASMedia chip. These are attatched to  3TB and 1TB WD Green drives. None of this is very exotic.

The CPU/Motherboard has integrated video, which I had attached over DVI to an external monitor. The machine is intended to run headless, but I want to run some OpenCL stuff on the GPU, so I had to install video card drivers. By default, the system installed the open source radeon driver, but, from what I could tell, this doesn’t yet have OpenCL support, so I switched to the proprietary binary flgrx driver.

With that background out of the way, I’ll detail the many annoyances I’ve had with this system.

First off, I found that it would often boot slowly, or hang all together, and this tended to involve drives connected to the ASMedia SATA controller. Sometimes it would hang or take forever to detect connected drives. Other times, it would hang on the main BIOS screen, while lighting an activity light on one of those drives. After some trial and error, I figured out it worked much better if I disabled “Compatibility Support Mode” (CSM) in the boot section of the BIOS setup.

The next problem came when I shut the machine down, detached it, and moved the machine to its final location. When I rebooted it, it emitted 5 sharp beeps and then didn’t seem to do much of anything else, except light up the activity light on one of the drives connected to the ASMedia controller. I tried leaving it for a while, to see if it proceeded to boot, but finally gave up and tried resetting it. That didn’t work either, no beeps this time, but it still seemed to hang with the drive light activated. I moved it back to the desk, hooked up the monitor and tried to figure out what had gone wrong.

I found that the BIOS seemed to have reverted back to compatibility mode, moreover, the primary GPU was listed as being PCI Express, rather than integrated. A little digging and I learned that the 5 beeps meant “without vga card.” I mucked around a bit more, trying different things, before reaching the conclusion that this board has major problems, at least for my application.

I’m not sure what I’m going to do next. I realize it might be worth disabling the boot recovery mode, because that may be part of the reason it is falling back to a problematic BIOS configuration. My guess is that I may still have trouble with the internal video, but I might be able to address that with an explicit kernel option (assuming that the boot process still continues). Another option is to see if I can hook something to one of video ports that tricks it into thinking a monitor is connected.

KMASHI 10,000 mAh USB Power Bank / Backup Charger Teardown

I decided to buy a USB “power bank” or backup external battery to keep in my backpack to recharge my phone or iPad when I am away from the house.

I looked at lots of options over the course of a few months before I pulled the trigger. It was hard to make the decision because their seemed to be a big variance in capacity, price, and charging rates. What finally tipped me over the edge was finding a 10,000 mAh unit that could charge external devices at 2A and recharge at 2A for $17.99. Actually, the numbers associated with the model I purchased, (KMASHI 10,000 mAh) USB specs aren’t that unusual, but often times, the devices fall short of their claimed capacity. In this case though, there was a review by someone who’d done some testing and found that it pretty much hit the mark (though it did seem to fall short in the rate it charged USB devices).

When I received the product, I was a little disappointed. It worked as promised, and seemed solidly made, but It was bigger and heavier than I’d expected, and so I decided to crack it open to find out why.

It took some effort to get it open. I thought it might be glued shut, but with a little effort, I was able to persuade some of the latching tabs that held the case together to slip free by jamming something into a seam and working it around.

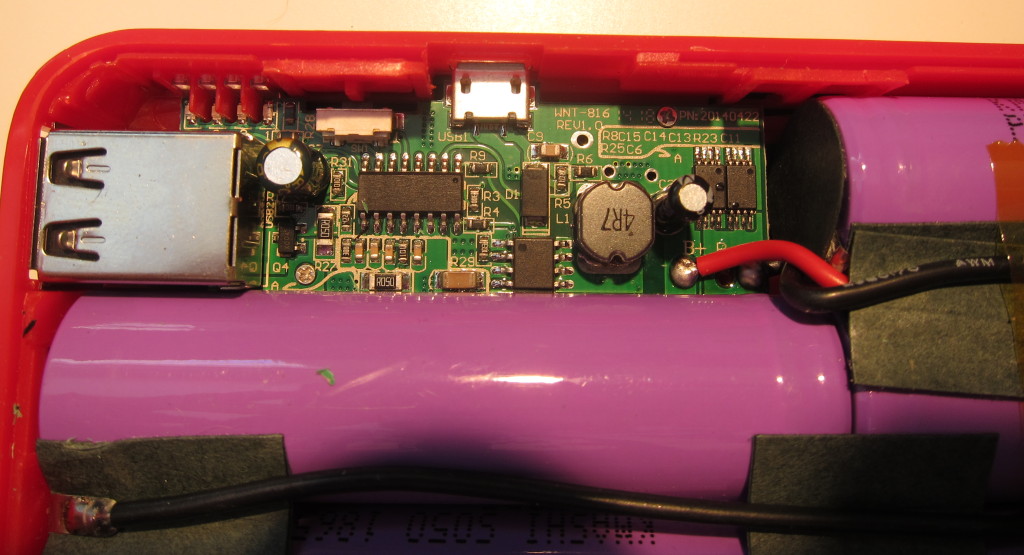
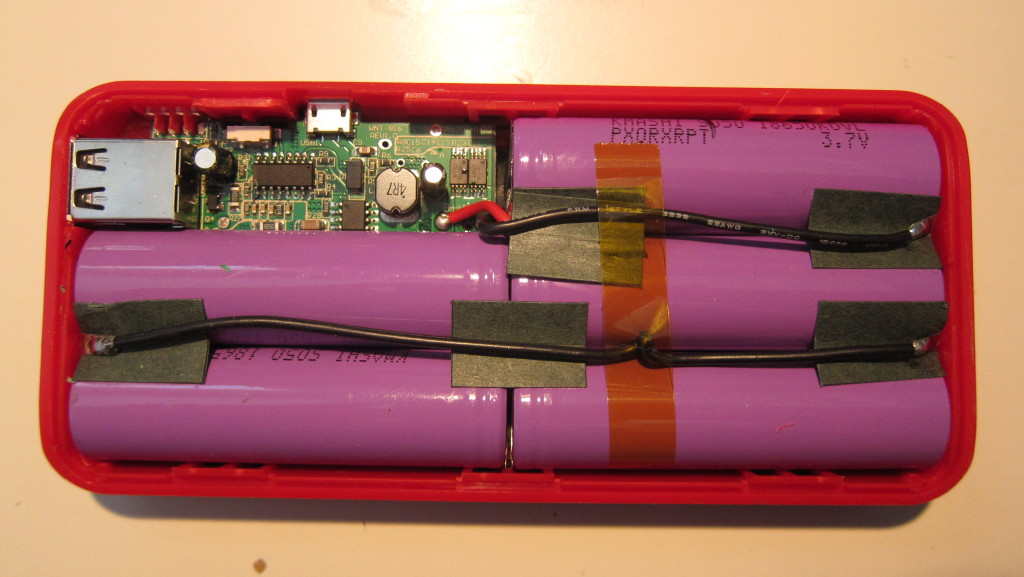
IMG_5700This is what I found inside. As you’d expect, a good portion of the volume is taken up by the batteries, five cylindrical 18650-sized lithium ion cells. This is the reason for the size and weight of the device. First off, the cylindrical cells don’t pack together as tightly as flat-pack pouch cells found in most phones, tablets, and higher end USB battery packs. Second, their steel walled container weighs more than the plastic membrane used on flat pouch cells.

The bigger issue though is that there are five of them, which means that they must each have a capacity of only 2,000 mAh. That’s not much. 18650 cells (which stands for 18mm diameter, 65.mm length) are widely used for laptops, battery powered tools, and even Tesla automobiles. I pulled some 18650 cells out of ~5 year old laptop battery packs that are rated for 2,600 mAh and still deliver ~2,550 mAh. More recent laptops use cells with 3,000, 3,200, or perhaps even 3,400 mAh capacity, so it would be possible to build a power bank of equivalent capacity with four, or as few as three cells, with a corresponding reduction of weight and size.

On the other hand, those larger capacity cells from Panasonic, Samsung, Sony, and others, retail for $6-8/cell, and 2,600 mAh cells go for ~$3-3.50. I am sure these cells were much much cheaper.

IMG_5701


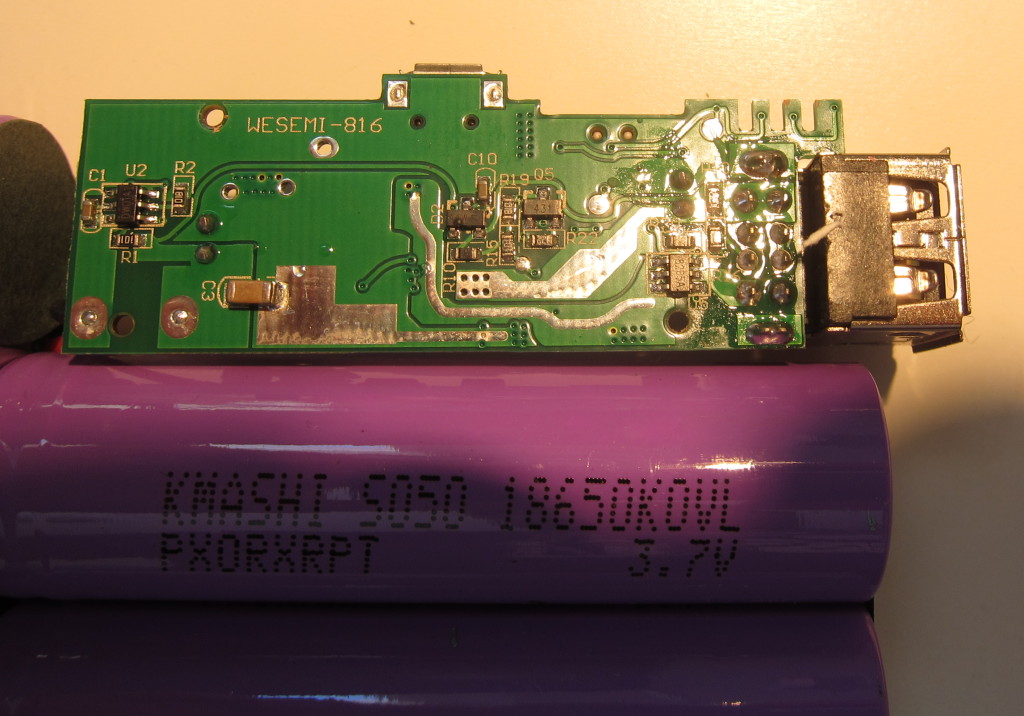
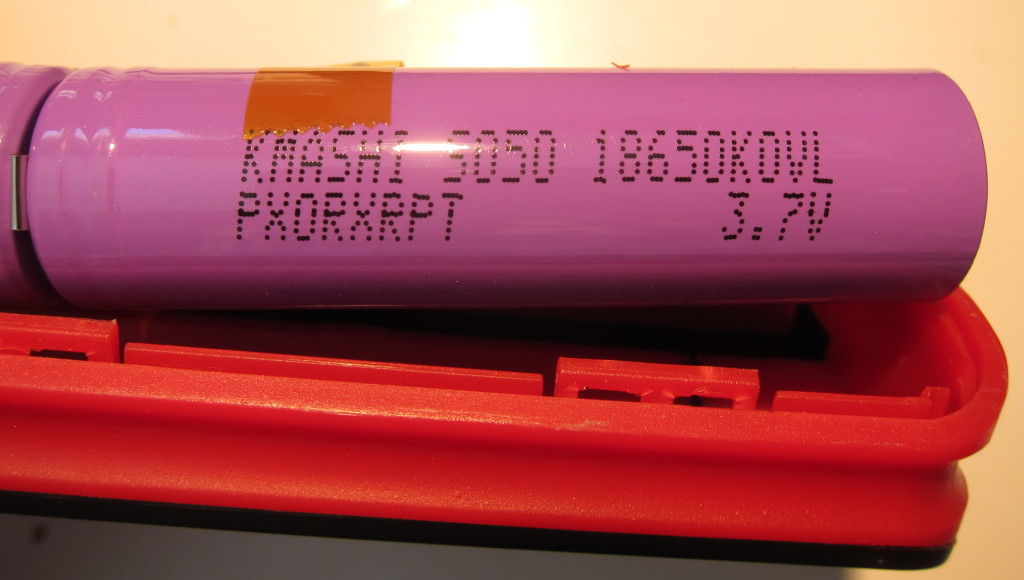
The cell wrappers are labeled “KMASHI SO50 18650KOVL PXORXRPT 3.7V,” This doesn’t give much of a clue as to the true origin of these cells. KMASHI doesn’t appear to be an actual battery manufacturer, that comes up in other contexts. 3.7V is the typical voltage for lithium ion cells, and 18650 is a common form factor, but searches for any of the terms on the label doesn’t produce useful results. I could cut the wrap off and see if there are any clues printed on the metal, but then I’d have to rewrap the cell, which would be a pain since they are all welded together.

So, who knows what kind of cells these are, they might even be reused used cells, for all I know.

IMG_5702

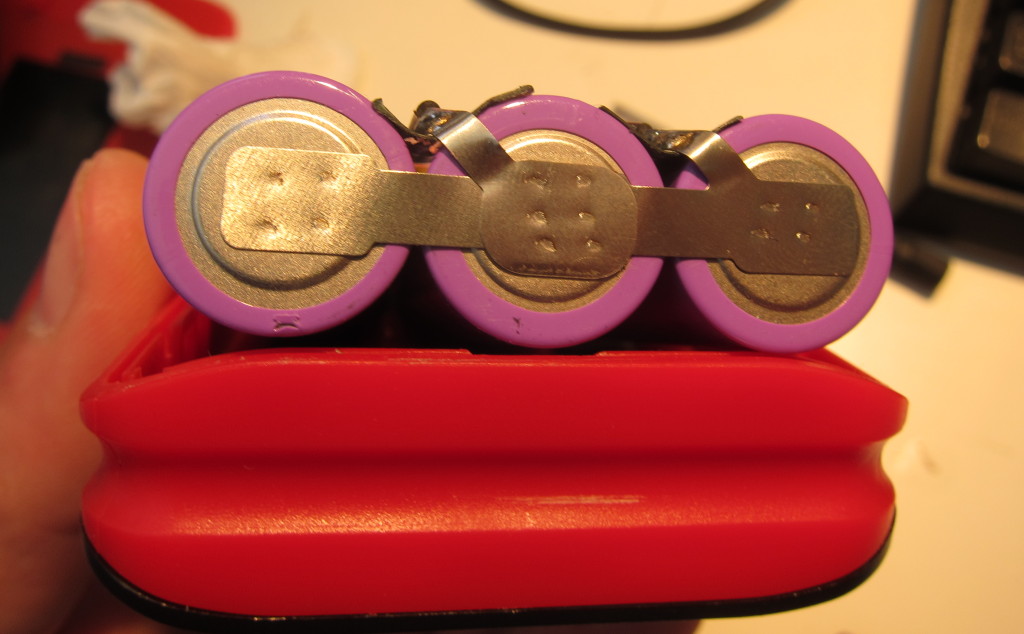
This photo shows that the cells have been spot welded together in a parallel configuration, which is commonplace in multi-cell USB battery packs. I suspect the parallel approach is typically used for a few reasons. First, it should be more tolerant of lower quality cells than the series-configuration. Second, it should pose less of a risk of frying the USB device if the voltage regulation circuit is funky. Finally, it makes it easier to charge the pack off of a USB power adapter.

Looking at the end of these cells gives another hint that these may be reused cells. From my experience, raised bottoms are unusual on 18650 batteries, and others have reported that they are often used to hide the evidence of old welds on cells that have been pulled out of assembled battery packs.

If they are reused cells, that causes me some concern. If they are good quality cells from battery packs that just sat on the shelf (aka New Old Stock), then it would be a non-issue as I have obtained cells that way myself. If they’ve actually been used, or if they are from very old packs though, thats a problem, as they could fail prematurely, and failing lithium ion batteries can be dangerous.

IMG_5699


For completeness, I give you the printed circuit board, which is labeled as “WNT-816 Rev 1.0” and “PN:20140422” on the top. I can’t say much about the components. The two largest chips appear to have been sanded to obscure their origins. There are two other chips that have their markings which read “FS8205A,” near as I can tell, they are used for managing the discharge of lithium-ion batteries.That, and the inductor is solid-core, unlike the many hollow-core inductors I’ve seen on the powerbank PCBs they sell on Fasttech.

IMG_5705

On the bottom, it is labeled “wesemi-816.”

I reassembled it and I’ve used it since taking it apart. It works pretty much as expected. I’ll post an update in a few weeks once I get some stuff I ordered for testing USB power sources.

Lenmar and NuPower MacBook Pro Battery Pack Teardown

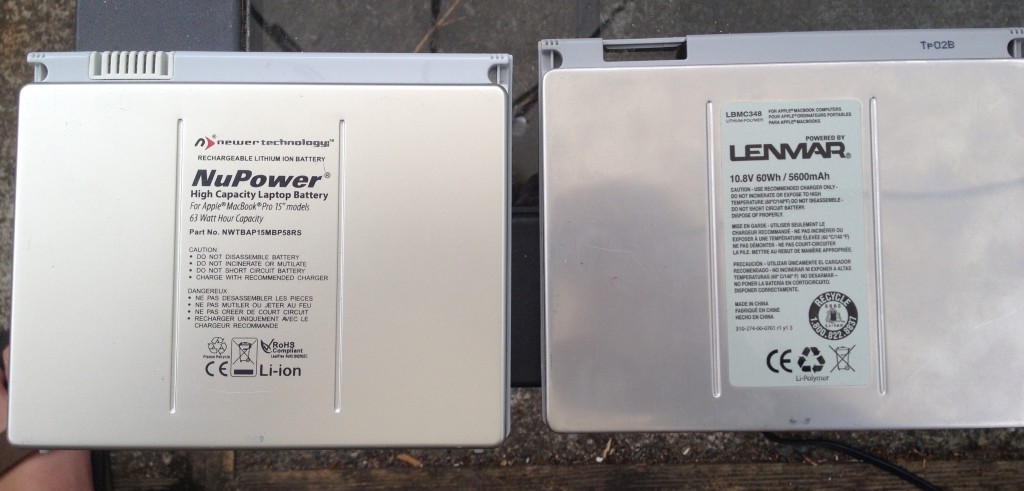
Today I took apart two different 3rd party battery packs for the 2006-2008  15″ MacBook Pro. The OEM batteries had the following model numbers A1175, MA348, MA348G/A, MA348J/A, MA348*/A.

These packs probably date from early 2010.

NuPower and Lenmar batteries

NuPower and Lenmar batteries

The first is a Newer Technology NuPower 63Watt Hour Capacity Battery, part # NWTBAP15MBP58RS. There is a barcoded sticker on the outside with the number U091228A11753.

The second is a Lenmar, 10.8v, 60WH/5600 mAh. Model/Part LBMC348.

Superficially they look very similar, but their are some significant differences in their construction.

The NuPower has a relatively thick aluminum plate on the outer surface that is glued to the case. If I recall correctly, this glue failed prematurely and had to be redone. The bottom section of the battery pack is a single piece of plastic, though the back side is painted with a metallic paint to simulate the appearance of the original Apple battery. While this would seem to be a reasonable construction approach, one has to wonder why Apple chose to use a metal back in the first place. A metal back would be thinner than a plastic back, and also transfer heat more readily.

The Lenmar uses a thinner sheet of aluminum for its outer plate. This plate is then adhered to a thin steel sheet that has various bent tabs which catch and latch into the plastic frame of the bottom case. The plastic frame is then glued to a thin steel tray. This is closer to the construction of the original Apple battery pack

Internal view of NuPower and Lenmar battery packs

Internal view of NuPower and Lenmar battery packs

Once inside, we see a more significant difference in the construction of the two battery packs.

5,600 mAh Lithum polymer pouch cells in NuPower battery pack

5,600 mAh Lithum polymer pouch cells in NuPower battery pack

Cells from Lenmar battery pack

Cells from Lenmar battery pack

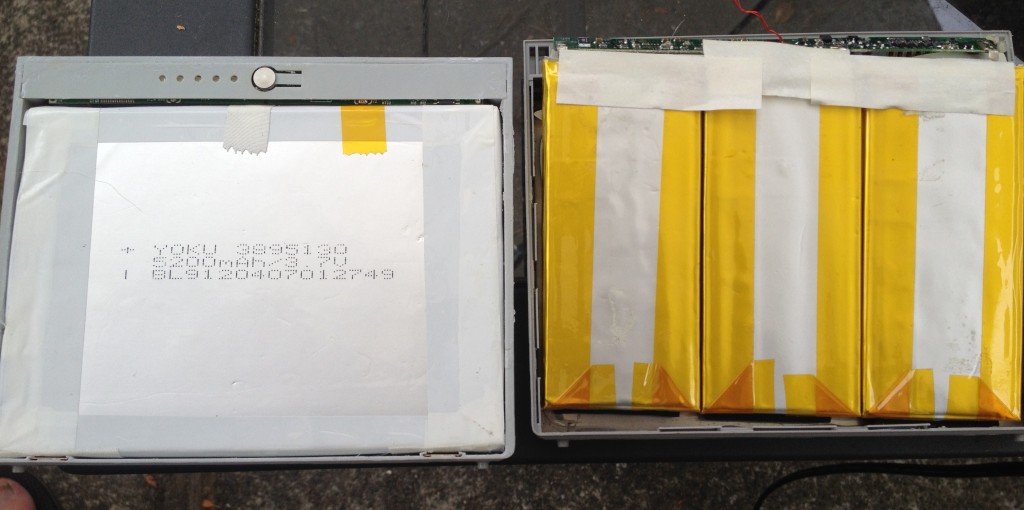
The NuPower pack, on the left, has a single stack of three 3.7v 5,200 mAh cells. They are labeled as Yoku 3895130, 5,200 mAh/3.7v, BL9120407012749. They measure ~130x95mm and the stack of three is ~11.25mm thick.

The Lenmar pack, on the right, has 3 stacks of pouch cells, each stack is 2 cells deep, connected in parallel. They are labled as YLE 3.7v, ICS594395A280 468061801483. Each pair of cells is ~90x42mm and is also ~11.25mm thick.

I don’t have an original Apple battery around to use in a close comparison, but the Lenmar battery pack construction is much closer to my memory of the stock Apple battery, both in terms of cell configuration, and assembly. I’m still not sure what to make of the absence of a metal back on the NuPower battery. I thought perhaps the Apple and LenMar batteries used the metal back to accommodate a slightly thicker battery, but that doesn’t seem to be the case, since the thickness of the cells in both the Lenmar and NuPower packs is 11.25mm. I don’t know how thick the cells are in an original Apple battery, but I suspect that the metal is there for better heat transfer, and its omission seems like an undesirable bit of cost cutting.

Looking more closely at the cells, I see that Yoku is a battery manufacturer based in Fujian, China. I’m going to guess that the “3895130” gives the dimensions of the cell, 3.8x x95x130mm, which pretty much matches with the dimensions I measured. I don’t know what the remaining number is, but my guess is that it is a manufacturing lot code.

YLE is manufacturer based in Shenzen, China. and ICS594395A280 is a documented part number for a 5.9x43x95mm 2,800 mAh/3.7v cell.

Interesting that the nominal capacity of the Lenmar cells are higher than the cells used in the NuPower, but NuPower claims theirs is a 63 Watt-hour battery, while Lenmar only claims 60 Wh. At this distance though, what I know is that the Lenmar pack is well and truly dead. Two of the parallel packs had voltages ~1v, which is dangerously low. The remaining pair of cells was ~2.6v, which might still be safe to use, though I’d have to put it through testing to see how much of the rated capacity remains. The NuPower still works, and the cells were at something close to 3.7v each. The estimated capacity of the pack, as reported by System Information, is quite low though, perhaps 50% of original, which is why I decided to tear it open in the first place.

I’m not sure what I’m going to do next, other than recycling the low cells. I’ll probably set the good cells aside until I get a hobby charger that I can use to analyze them and decide whether they are worth keeping to power misc projects.

I’m also going to look into buying replacement cells and rebuilding the packs, provided that the price is right and the seller is reputable. I could just order a replacement for the whole pack, but I’d be a bit concerned about getting old stock at this late date.